|
|
|
Who's Online
There currently are 5992 guests online. |
|
Categories
|
|
Information
|
|
Featured Product
|
|
|
 |
|
|
There are currently no product reviews.
 ;
Excellent printing quality.
A complete and very usefull service manual with all details.
GREAT SERVICE AT VERY LOW PRICE!
A+++++++++++++++++++++++++
;
Very fast and perfect delivery. Clear and well scanned. A lot of work professionally realized.
Again thak you a lot
 ;
This manual is accurate and of high quality. It is only volume 2 of the service manual. This is schematic, parts lists, and exploded mechanical drawings. The theory of operation and the diss-assembly instructions are in volume 1. The unit can be tricky to dis-assemble portions of so the volume 1 manual can be important. The product description of the manual is accurate but it does not say anything about volume 1 and the image of the front page does clearly say Volume 2.
;
Wellll again thank you very much fast and effective. Clear and well done for such an old TV!!!!
;
It has all the information you will need to fix it. The main circuit diagram is only A4 but being a PDF, you can print it to any size - I did it on two sheets of A3 and it didnt lose any detail - just made it readable when pinned up above the bench. I've found the fault, just need to buy some obscure bits to get it going again!
I cant fault the process, I paid for the manual in the morning and it was ready to download by lunch time.
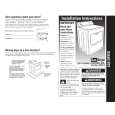
AV-T2922
PURITY, CONVERGENCE
PURITY ADJUSTMENT
1. Demagnetize CRT with the demagnetizer.
W EDGE DEF LECT ION YOKE
2. Loosen the retainer screw of the deflec tion yoke. 3. Remove the wedges.
CR T
P
4. Input a green raster signal from the signal generator, and turn the screen to green raster.
46
5. Move the deflection yoke backward.
P/C MAGNET S
6. Bring the long lug of the purity magnets on the short lug and position them horizontally. (Fig.2)
# P/C MAGNETS P : PURITY MAGNET 4 : 4 POLES (convergence magnets) 6 : 6 POLES (convergence magnets)
7. Adjust the gap between two lugs so that the GREEN RASTER will come into the c enter of the screen. (Fig.3)
Fig. 1
8. Move the deflection yoke forward, and fix the pos ition of the deflection yoke so that the whole screen will bec ome green.
9. Ins ert the wedge to the top side of the deflection yoke so that it will not move. 10. Input a cross hatch signal.
Long lug
PURIT Y MAGNET S
11. Verify that the screen is horizontal.
Short lug
12. Input red and blue raster signals, and make sure that purity is properly adjusted.
Bring the long lug over the short lug and position them horizontally.
Fig. 2
(F RONT VIEW )
GREEN RASTER
��
CEN TER
Fig. 3
No.51917
27
|
|
|
> |
|