|
|
|
Who's Online
There currently are 6043 guests online. |
|
Categories
|
|
Information
|
|
Featured Product
|
|
|
 |
|
|
There are currently no product reviews.
 ;
I want to give you a real heads-up for your desire to enable such people as I to acquire the information I need to maintain the older types of equipment such as this Akai HXA351W. You do a swell job with all the processes you have to perform so I can have a legible, thus usable
document which does not send me crazy trying to figure out the blurry text of a bad copy.
Very well done, Thomas.
;
This manual is very well presented and after printing out looks about as close to an original as I think you can get. The quality is second to none.
The content of the manual is comprehensive and I think it would be well suited to an audio repair professional which I'm not but I did find it very informative and helpful.
The cost of the manual is more than covered by the money I'll save when I change the keep memory battery now I have the relavant info.
Very pleased with my purchase and can recommend it wholeheartedly as I can other manuals I've downloaded from this site.
Regards
Limey Alex
 ;
Complete manual including mechanical part in good pdf quality. Shaded greys of the pcb due to pdf not perfect but usable.
;
Nice pdf file of the manual sent promptly. Thanks.
;
Complete MFG Service Manual at a good price FAST !
5.4
Updating the firmware of the drive unit
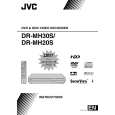
� Firmware update disc supports only DVD-RAM media. � When firmware update is necessary, written discs are distributed by DIGITAL VIDEO STORAGE CATEGORY, CS group. (1) Turn the main body ON. (2) Load the update DVD-RAM disc on the tray and close the tray. (3) �READING� is displayed in the FL indicator and the update is started. (4) In a short while �READING� in the FL indicator disappears, open the tray to remove the disc and close the tray. (5) Turn the power OFF and pull out the power code from the wall socket, then plug the power cord into the wall socket again. (6) Set to the JIG mode and check the firmware version of the drive. 5.5 Taking out a disc <Method 1 > There is a forced tray eject mode with electrical operation. (1) Right after plugging in the power code (while �LOADING� is displayed), keep pressing the OPEN/CLOSE button of the main body. (2) Remove the disc as the tray is ejected in a short while. (3) Make sure to close the tray afterwards. <Method 2 > When the disc cannot be removed by operating above <Method 1 >, open the front door of the main body manually and directly press the EJECT button located in the lower right of the drive unit. <Method 3 > When neither <Method 1> nor <Method 2> can remove the disc, the tray can be ejected mechanically without turning the power on. (1) Open the front door of the main body manually. (2) Insert a fine wire (e.g. a straightened paper clip) into the hole in the lower part of the tray of the drive unit. (3) As the tray ejects a little, pull out the tray manually.
Front door
Tray
Hole EJECT Button
5.6 Exchanging the fitting As the fitting that comes with the service drive unit cannot be used, make sure to attach a service fitting when the drive unit is exchanged. The fitting that is removed from the old drive unit can be attached to the new drive unit. The fitting can be removed by pulling upwards while opening out the lower part of the fitting outwards.
Tray
Fitting
1-16 (No.YD027)
|
|
|
> |
|