|
|
|
Who's Online
There currently are 6006 guests online. |
|
Categories
|
|
Information
|
|
Featured Product
|
|
|
 |
|
|
There are currently no product reviews.
 ;
This is a good quality scan of the original Service Manual from Nordmende, Germany. Contains the circuit diagram, PCB layout, adjust/tune instructions as well. It is NOT in English but in GERMAN language! That was quite right for my german friend from the lower east side in Berlin.
 ;
Received via e-mail this PDF manual is worth the money. This is a quality scan of a manual in excellent condition and is just as good as having the original manual in hand. I have later seen the original manual and it was printed in colour, but this particular manual is black & white but scan resolution is high end quality! All drawings and pictures are presented in great detail. So, nearly perfect score in my opinion.
If you own the turntable you also should own the manual!
;
I was very satisfied with the service manual I ordered and downloaded. I will definitely buy again from this seller.
;
Great product. Recieved it fast...exactly as advertised.
;
Manuals were delivered promptly and were correct as advertised. No issues with the download link which was provided promptly after everything was processed. Very pleasant experience
5.4
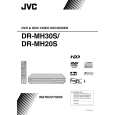
Updating the firmware of the drive unit
� Firmware update disc supports only DVD-RAM media. � When firmware update is necessary, written discs are distributed by DIGITAL VIDEO STORAGE CATEGORY, CS group. (1) Turn the main body ON. (2) Load the update DVD-RAM disc on the tray and close the tray. (3) �READING� is displayed in the FL indicator and the update is started. (4) In a short while �READING� in the FL indicator disappears, open the tray to remove the disc and close the tray. (5) Turn the power OFF and pull out the power code from the wall socket, then plug the power cord into the wall socket again. (6) Set to the JIG mode and check the firmware version of the drive. 5.5 Taking out a disc <Method 1 > There is a forced tray eject mode with electrical operation. (1) Right after plugging in the power code (while �LOADING� is displayed), keep pressing the OPEN/CLOSE button of the main body. (2) Remove the disc as the tray is ejected in a short while. (3) Make sure to close the tray afterwards. <Method 2 > When the disc cannot be removed by operating above <Method 1 >, open the front door of the main body manually and directly press the EJECT button located in the lower right of the drive unit. <Method 3 > When neither <Method 1> nor <Method 2> can remove the disc, the tray can be ejected mechanically without turning the power on. (1) Open the front door of the main body manually. (2) Insert a fine wire (e.g. a straightened paper clip) into the hole in the lower part of the tray of the drive unit. (3) As the tray ejects a little, pull out the tray manually.
Front door
Tray
Hole EJECT Button
5.6 Exchanging the fitting As the fitting that comes with the service drive unit cannot be used, make sure to attach a service fitting when the drive unit is exchanged. The fitting that is removed from the old drive unit can be attached to the new drive unit. The fitting can be removed by pulling upwards while opening out the lower part of the fitting outwards.
Tray
Fitting
1-18 (No.YD026)
|
|
|
> |
|