Nothing wrong with the manual or the delivery - came to me the same day I ordered it. But afterwards I realized that I ordered the wrong manual. Probably better with the Quick start - version. So maybe it would be better if we could see a list with inhold for each manual before ordering?
Bought T4850 High End Tuner a few years ago, but i didn't know where all the buttons were used for. So i purchased the owners manual. Perfect! Just what i needed.
Bought the used Philips car-radio. No manual! Found on this site a copy of the orginal English manual. I am very happy with it. Now I know how to setup and use my "new" car-radio.
Recommended site for everybody looking for a manual for (older) products!
Great deal, you are the only one on earth who could deliver this old manual. Thx so much and have nice chrismas
Text excerpt from page 8 (click to view)
8
1 2 3
Recording Start/Stop button
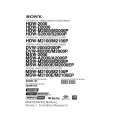
GETTING STARTED (cont.)
Grip Adjustment
EXPAND LOOP
Separate the Velcro strip.
INSERT HAND
Pass your right hand through the loop and grasp the grip.
ADJUST STRAP LENGTH
Adjust so your thumb and fingers can easily operate the Recording Start/Stop button and Power Zoom switch. Refasten the Velcro strip.
Shoulder Strap Attachment
1
1 3 2 1 2
Following the illustration at left, thread the strap through the top of the eyelet 1, then fold it back and thread it through the keeper 2, and then through the buckle 3. Repeat the procedure to attach the other end of the strap to the other eyelet, making sure the strap isn�t twisted.
ATTACH STRAP
ADJUST LENGTH
2
Adjust as shown in the illustration at left 1, then slide both keepers snug against the eyelets to prevent slipping 2.
Tripod Mounting
ALIGN AND TIGHTEN
1
Align the screw and camera direction stud on the tripod with the camera�s mounting socket and stud hole. Then tighten the screw.