|
|
|
Who's Online
There currently are 5732 guests and
2 members online. |
|
Categories
|
|
Information
|
|
Featured Product
|
|
|
 |
|
|
There are currently no product reviews.
 ;
Great price, Quick delivery, the document was very usefull A+++++++++++++++
;
Thank´s for your help, I already recived these manual from you
;
Thank you for your manual It has the basic things to and i use the Oszi for Longer Time.
THX
;
Actually, I was looking for this information for 3 years!...now thanks to you, the manual is on my hands and of great help, cause I understand now where I was doing wrong connections and wires...excellent, I'll be back to you if in need, thank you.
 ;
This manual covers the main equipment features only. While it also includes the procedure for saving and loading from the now long obsolete memory cards it does not mention the how to operate with the optional floppy drive interface so I am still at a loss about how to use this! Note that there is a separate manual covering the MIDI interface and programming via the keyboard, not included in this download. You will also need to get hold of this if you want to use the MIDI interface properly. Basically there is little difference between this manual and the free to download manual for the similar PR60 model.
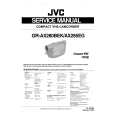
TAPE DUBBING
Tape Dubbing
CONNECT EQUIPMENT
PLAY/PAUSE
EN
37
1 2 3
Following the illustration to the left, connect the camcorder and the VCR.
PREPARE FOR DUBBING
Set the camcorder�s Power Switch to �PLAY�, turn on the VCR�s power, and insert the appropriate cassettes in the camcorder and the VCR.
SELECT VCR MODE
Engage the VCR�s AUX and Record-Pause modes.
FIND EDIT-IN POINT
Power Switch
4
To AUDIO and VIDEO OUT connectors
Engage the camcorder�s Play mode to find a spot just before the edit-in point. Once it�s reached, press PAUSE on the camcorder.
When connecting the cables, open the jack cover.
START EDITING
5 6 7
Press PLAY on the camcorder and engage the VCR�s Record mode.
Audio and Video cables (provided)
STOP EDITING TEMPORARILY EDIT MORE SEGMENTS
Engage the VCR�s Record-Pause mode and press PAUSE on the camcorder. Repeat steps 4 through 6 for additional editing, then stop the VCR and camcorder when finished.
If your TV/VCR has the SCART connector, use the cable adapter. (provided with GR-AX480 only)
To AUDIO and VIDEO IN connectors
VCR (Recording deck)
|
|
|
> |
|