|
|
|
Who's Online
There currently are 5941 guests online. |
|
Categories
|
|
Information
|
|
Featured Product
|
|
|
 |
|
|
There are currently no product reviews.
 ;
Perfect. Very good service and very good scanning quality. All sheets are very legible. Thank's
;
My first manual from Owner-Manuals.com but not the last! I am very satisfied with the easy ordering and promt delivery of a manual I did not find anywhere else.
 ;
This manual is very helpfull to use the Power Supply. All technical information has been available.
For service use the circuit diagrams are very good.
Thanks .
;
Very comprehensive document which is a must-have for any Satellit 2100 owner whose set up is somewhat intricate. Due to the bad quality of the pictures that are rather dark and a bit blurred I gave 4-star feedback.
;
The manual was missing 2 pages but when I presented the problem to the company they made every attempt to get the 2 pages to me, when they couldn't they refunded my money. A very pleasing and easy transaction. The manual they provided was the original, it was concise and to the point. I plan to do business with this company again when should the need arise.
EDITING EN
25
Dubbing To Or From A Video Unit Equipped With A DV Connector (Digital Dubbing)
It is also possible to copy recorded scenes from the camcorder onto another video unit equipped with a DV connector. Since a digital signal is sent, there is little if any image or sound deterioration.
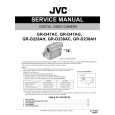
1 Make sure all units are turned off. 2 Connect this camcorder to a video unit equipped with
a DV input connector using a DV cable as shown in the illustration.
To use this camcorder as a player
3 Set this camcorder�s Power Switch to �PLAY� while
pressing down the Lock Button located on the switch. 4 Turn on the video unit�s power.
5 Insert the source cassette in this camcorder. 6 Insert the recording cassette in the video unit. 7 Press 4/9 on this camcorder to start playback of the
source cassette.
8 At the point you want to start dubbing, engage the
video unit�s Record mode.
9 To pause dubbing, engage the video unit�s RecordPause mode and press 4/9 on this camcorder.
10 Repeat steps 7 � 9 for additional editing. Stop the
To DV IN/OUT
video unit and camcorder.
NOTES:
Core filter
DV cable (optional)
To DV IN/OUT
� It is recommended to use the AC Adapter as the power supply instead of the battery pack. ( pg. 7) � If a blank portion or disturbed image is played back on the player during dubbing, the dubbing may stop so that an unusual image is not dubbed. � Even though the DV cable is connected correctly, sometimes the image may not appear in step 8. If this occurs, turn off the power and make connections again. � If SNAPSHOT is pressed during playback, only the original playback image recorded on the tape is output from the DV connector. � When using a DV cable, be sure to use the optional JVC VC-VDV204U DV cable.
Video unit equipped with DV connector
To use this camcorder as a recorder 1) Perform steps 1 to 3 in �To use this camcorder as a player�. 2) Set �REC MODE� to �SP� or �LP�. ( pg. 14, 15) 3) Insert the recording cassette in this camcorder. 4) Press the Recording Start/Stop Button to engage the Record-Pause mode.
� The � DV. IN � indication appears on the screen.
5) Press the Recording Start/Stop Button to start recording. The T indication rotates. 6) Press the Recording Start/Stop Button again to stop recording. The T indication stops rotating.
NOTE:
Digital Dubbing is performed in the sound mode recorded on the original tape, regardless of the current �SOUND MODE� setting. ( pg. 15)
ADVANCED FEATURES
|
|
|
> |
|