|
|
|
Who's Online
There currently are 5978 guests online. |
|
Categories
|
|
Information
|
|
Featured Product
|
|
|
 |
|
|
There are currently no product reviews.
 ;
This GRUNDIG UV5A Owner Manual is not only an instruction manual but a total functional circuit description of the Multimeter and includes circuit diagram at the end pages. It is very helpful for repairing and calibrating the instrument. It is written in two languages English and German for international support. It was very easy to repair my unit with this document. Regards, Regis Pauly, Electrical Engineer.
;
The owner's manual was evetything I thought it would be. I was able to print it out using both sides of the paper in quick order, saving me a search online for a used one.
 ;
Хорошее качество сканирования.
Мануал пришел часов эдак через 12. В целом доволен.
;
Fantastic quality and impressive delivery time. Based on this manual, I recommend this service without hesitation! Five Stars for certain.
;
Was happy to find the complete owners manual... It's all in there, just like the original...
Basic Shooting (Snapshot)
You can use your camcorder as a digital still camera for taking snapshots. Perform the procedures listed below before continuing. � Power ( pg. 7) � Grip Adjustment ( pg. 8) � Viewfinder Adjustment ( pg. 8) � Loading A Memory Card ( pg. 11) � Picture Quality/Image Size Setting (
t
pg. 11)
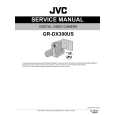
1 Set the VIDEO/MEMORY Switch t to �MEMORY�,
then set the Power Switch @ to � � or � � while pressing down the Lock Button $ located on the switch. Open the LCD monitor fully or pull out the viewfinder fully.
$ 9 @
Image Size pg. 11 pg. 54, 55 Card icon
1024
2 Press SNAPSHOT 9. �PHOTO� Q appears while
the snapshot is being taken. The image is recorded on the memory card. � Still images are recorded in the snapshot mode with no frame. To Delete Unwanted Still Images . . . ..... when unwanted still images are stored in the memory card or its memory is full, refer to �Deleting Files� ( pg. 20) and delete unwanted still images. To Remove The Shutter Sound . . . ..... when you do not want to hear the shutter sound, set �BEEP� to �OFF� in the Menu Screen ( pg. 34). The sound is no longer heard from the speaker.
Shooting icon
pg. 54, 55
15
Remaining number of shots pg. 54, 55 (Approximate Number of Storable Images pg. 18)
Picture Quality Display
pg. 11
NOTES:
� Even if �DIS� is set to �ON� ( pg. 33), the Stabilizer will be disabled. � If Snapshot recording is not possible, �PHOTO� Q blinks when SNAPSHOT 9 is pressed. � If Program AE with special effects ( pg. 27) is engaged, certain modes of Program AE with special effects are disabled during Snapshot recording. In such a case, the icon blinks. � If shooting is not performed for approx. 5 minutes when the Power Switch @ is set to � � or � � and power is supplied from the battery pack, the camcorder shuts off automatically to save power. To perform shooting again, close the LCD monitor and re-open it. When using the viewfinder, push back it in and pull it out again. � The Motor Drive mode ( pg. 29) is disabled when the VIDEO/MEMORY Switch t is set to �MEMORY�. � When a cable is connected to the S/AV connector &, the shutter sound is not heard from the speaker, however it is recorded onto the tape. � Still images taken are compliant to DCF (Design rule for Camera File system). They do not have any compatibility with devices which are not compliant to DCF.
To Protect Valuable Files (available only for SD Memory Card) . . .
Write/erase protection tab
..... slide the write/erase protection tab on the side of the memory card in the direction of �LOCK�. This prevents the memory card from being recorded over. To record on this memory card, slide the tab back to the position opposite to �LOCK� before loading it.
Refer to the diagrams on page 52 and 54 for the controls, indications, indicators and connectors mentioned.
MEMORY CARD RECORDING
EN
17
|
|
|
> |
|