This GRUNDIG UV5A Owner Manual is not only an instruction manual but a total functional circuit description of the Multimeter and includes circuit diagram at the end pages. It is very helpful for repairing and calibrating the instrument. It is written in two languages English and German for international support. It was very easy to repair my unit with this document. Regards, Regis Pauly, Electrical Engineer.
The owner's manual was evetything I thought it would be. I was able to print it out using both sides of the paper in quick order, saving me a search online for a used one.
Fantastic quality and impressive delivery time. Based on this manual, I recommend this service without hesitation! Five Stars for certain.
Text excerpt from page 27 (click to view)
EN27
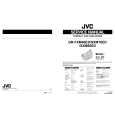
Exposure Control
This feature automatically adjusts the iris for the best available picture quality, but you can override it and make the adjustment manually. Manual exposure adjustment is recommended in the following situations: �When shooting using reverse lighting or when the background is too bright. �When shooting on a reflective natural background such as at the beach or when skiing. �When the background is overly dark or the subject light.
MENU Wheel
Power Switch
Manual Exposure Screen
00
Exposure control level counter
1 2 3 4 5
Set the Power Switch to �
�.
Press MENU. The Menu Screen appears. Rotate MENU to select �EXPOSURE� and press it. The EXPOSURE Menu appears. Rotate MENU to select �MANU�, then press it. The Menu Screen disappears and �00� (exposure control level counter) appears. To brighten the image, rotate MENU downward. The exposure control level counter increases (maximum +06). To darken the image, rotate MENU upward. The exposure control level counter decreases (maximum �06). Press MENU. The setting is complete. The Menu Screen reappears with the highlight bar on � RETURN�. Press MENU. The Menu Screen disappears and the exposure control level counter reappears to indicate the exposure is adjusted.
To brighten the image
�06
�06
+06
To darken the image
6 7
NOTES: � To return to the factory setting, select �AUTO� in step 4. � To re-adjust exposure, repeat the procedure from step 2.