|
|
|
Who's Online
There currently are 6015 guests online. |
|
Categories
|
|
Information
|
|
Featured Product
|
|
|
 |
|
|
There are currently no product reviews.
 ;
I do not have very much to say.
The price is quite covenient, delivery was better as promised (about 12 ours, against the specified 24 hours if I remember well), and the quality of the PDF is more than acceptable.
The Service Manual of Sansui R30 itself is also satisfactory: good graphic for schematics and layouts, simple and well structured.
Giovanni Bianchi
;
Happy to find finally a schematic for this amplifier. The schematic is of good quality, the pcb layout is useless: all is black. Never the less, it is very easy to find the components on the board using the schematics.
;
Hard to find manual was ready the next day. Scans were very legible (including schematics). All the essential parts of the service manual were present (adjustment procedure, schematics, and parts list). It would have been nice if the rest of the manual was included (disassembly procedure, theory of operation, etc.).
 ;
The Service Manual for the Kenwood KR-V55R provided by owner-manuals.com was as described/advertised. The contents provided the necessary information to effect a diagnosis of the unit. The schematics above all else was instrumental in tracing the the signal flow from component to component.
;
This manual was the factory original. Excellent value and contained all the details I needed. Easy dowwnload provided the information when I needed it.
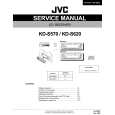
KD-S570/KD-S620
Disassembly method
Removing the front panel unit (See Fig.1)
1. Press the release switch and remove the front panel unit in the direction of the arrow.
Fig.1
Removing the front chassis (See Fig.2)
1. Insert a screwdriver to the joints a on the side of the front chassis and two joints b on the right side, then detach the front chassis toward the front side.
a
b
a
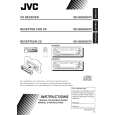
Removing the heat sink (See Fig.3)
1. Remove the three screws A attaching the heat sink on the left side of the body, and remove the heat sink.
Front chassis
b
Fig.2
A
A
A
Fig. 3
Heat sink
c
Removing the bottom cover (See Fig.4)
1. Turn the body upside down. 2. Insert a screwdriver to the two joints c and two joints d on both sides of the body and the joint e on the back of the body, then detach the bottom cover from the body.
Regulator board
d e
Fig. 4
1-4
 $4.99 KDS620 JVC
Owner's Manual Complete owner's manual in digital format. The manual will be available for download as PDF file aft…
|
|
|
> |
|