|
|
|
Who's Online
There currently are 5914 guests online. |
|
Categories
|
|
Information
|
|
Featured Product
|
|
|
 |
|
|
There are currently no product reviews.
 ;
This manual covers the main equipment features only. While it also includes the procedure for saving and loading from the now long obsolete memory cards it does not mention the how to operate with the optional floppy drive interface so I am still at a loss about how to use this! Note that there is a separate manual covering the MIDI interface and programming via the keyboard, not included in this download. You will also need to get hold of this if you want to use the MIDI interface properly. Basically there is little difference between this manual and the free to download manual for the similar PR60 model.
;
Good list of manuals. I found a very rare one and easily get. Should be promptly to download, as we must to wait hours even after confirmed payment.
;
The manual was properly scanned and perfectly readable. The only small problem is that I couldn't use my dear Ctrl + F to find a word I needed.
;
Nothing wrong with the manual or the delivery - came to me the same day I ordered it. But afterwards I realized that I ordered the wrong manual. Probably better with the Quick start - version. So maybe it would be better if we could see a list with inhold for each manual before ordering?
 ;
Bought T4850 High End Tuner a few years ago, but i didn't know where all the buttons were used for. So i purchased the owners manual. Perfect! Just what i needed.
QUICK START
Connection with Other Devices
Before connecting to other devices, ensure to turn off the power supply of the device to be connected with the digital video processor.
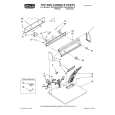
Connecting to a Projector
� Read through the projector�s instruction manual thoroughly. � Depending on the DVI cable used, signals may be attenuated and images may become unstable. Use high-quality DVI cables that are 5 m or shorter. When a DVI cable longer than 5 m is used, make use of a distribution system or an optical fiber cable. Right End of this Unit
H/C SYNC
V SYNC
I/R REMOTE
SCREEN
RS-232
UTPUT
DVI INPUT
DVI OUTPUT
100-240 VAC
50-60Hz 35 WATTS
DVI VIDEO IN
DVI Connection Cable (sold separately)
Caution on Devices to be Connected
Please refer to the list of �Devices Compatible with this Product� on the front page for devices that can be connected with this unit. Performance of this unit will not be guaranteed if it is connected with a device not specified in the list.
Setup of this Unit
1. Connect the supplied power cord to the power supply input terminal on this unit. Connect the earth wire to the equipped earth terminal in the building, followed by inserting the plug of the supplied power cord into the wall outlet. 2. This unit will be initialized once the plug of the power cord is inserted into the power outlet. Upon completion of initialization, this unit switches to the Standby mode (LED turns red). 3. Press the Power/Standby button on this unit (or Power button on the remote). Once the unit is turned on, the LED turns green. 4. Press the Menu button on the remote for 5 seconds or more to display the Setup Menu on this unit�s display panel. After the Setup Menu is displayed, use the Function Up/Down keys on the remote to select an adjustment. Select the set values accordingly using the Value Left/ Right keys on the remote. 5. Select Set: SCANRATE and set the value to 1920 x 1080. Press the STORE key on the remote. The message �Are You Sure� is displayed on the display panel of this unit. Press the STORE key on the remote again to set the scan rate.
6. Select Set: Active Output and set the value to Digital. 7. Select Set: Screen Shape and set the value to Wide Screen. 8. Press the Menu button on the remote to exit the Setup Menu.
Profile Setting
This unit can store up to 8 profiles. Each profile stores values that have been set for this unit during each adjustment. Select the profile number (1 - 8) at the OSD and press the STORE key on the remote to save the current settings. For further details, please refer to �OSD�. (� Page 10)
Video Image Adjustment
The following item can be adjusted according to the input signals. Adjusted values can also be stored in the profile. � � � � � � BRIGHTNESS (� Page 11) CONTRAST (� Page 11) COLOR (� Page 12) TINT (� Page 12) DETAIL (� Page 12) ADVANCED COLOR SYSTEM (� Page 12)
5
 $4.99 LD-HD2KU JVC
Service Manual Complete service manual in digital format (PDF File). Service manuals usually contains circuit diagr…
|
|
|
> |
|