|
|
|
Who's Online
There currently are 5842 guests online. |
|
Categories
|
|
Information
|
|
Featured Product
|
|
|
 |
|
|
There are currently no product reviews.
 ;
perfect and good copies, all good readable.
within 24hrs and very cheap also.
 ;
Great salespeople, muuito attentive recommend everyone buy this site.Obrigado by atendomento..
;
everything was fine - fast, readable, worth the price
;
I'm happy to get a manual from this rare old amp. The pdf is from good qualty.
;
very quick service and manual as described - would happily trade here again!
MX-G51R
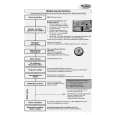
Removing the tuner board (See Fig.15 and 16)
Prior to performing the following procedure, remove the metal cover and CD changer unit. 1. Disconnect the card wire from connector CON01 on the tuner board. 2. Remove the two screws L attaching the tuner board.
Main board
CON01 Rear panel
Removing the echo board (See Fig. 15 and17)
Fig.16 Prior to performing the following procedure, remove the metal cover and CD changer unit. 1. Disconnect the harness from connector PJ2, PJ3 and RCW5 on the echo board. 2. Remove the two screws M attaching the echo board.
Echo board PJ3 RCW5
Tuner board
Rear panel PJ2
Fig.17
Main board
Removing the rear cover
(See Fig.18)
Prior to performing the following procedure, remove the metal cover, CD changer unit, heat sink & AMP board and tuner board. 1. Remove the four screws N and one screw N' attaching the rear panel.
N'
N
Fig.18
1-10
|
|
|
> |
|