|
|
|
Who's Online
There currently are 5988 guests online. |
|
Categories
|
|
Information
|
|
Featured Product
|
|
|
 |
|
|
There are currently no product reviews.
 ;
Very good quality download here. Great hard to find manuals at a reasonable price.
 ;
I had a problem with the mains transformer, I did not know the voltages on the secondary, this manual helped me to solve this problem, thanks for the manual!
;
Great manual, great quality copy, complete parts reference and scematics, Thank you
;
Very good as always. Also this manual appears clear and well processed. I know it will help me to work on this TV. Thank you a lot! Matteo
;
complete wiring diagram, without the part list. high quality copy. thanks for promptly.
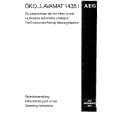
MX-J270V Removing the rear cover, the rear panel, the voltage selector and the video board (See Fig.12 to 15)
Prior to performing the following procedures, remove the metal cover and the CD changer mechanism assembly. It is not necessary to remove the front panel assembly. 1. Remove the two screws F and the rear cover on the back of the body. 2. Remove the four screws G and the seven screws H attaching the main board and the heat sink to the rear panel. 3. Remove the screw I attaching the rear panel to the chassis base. 4. Remove the two screws J attaching the rear panel to the voltage selector. 5. Remove the two screws K attaching the rear panel to the video board. 6. Release the lower two joints f and g on both sides of the rear panel using a screwdriver and detach the rear panel backwards.
Rear panel
F
Rear cover
F
Fig.12
H (To Earth bracket) H
Rear panel
J G G I
Fig.13
K
Joint f Rear panel
Fig.14
Rear panel Joint g
Fig.15 1-8
|
|
|
> |
|