|
|
|
Who's Online
There currently are 5726 guests online. |
|
Categories
|
|
Information
|
|
Featured Product
|
|
|
 |
|
|
There are currently no product reviews.
 ;
I purchased the unit from a private party and the original owners manual was not available. Having the ability to download it was extremely helpful and clarified operating the equipment immensely. This is a complicated unit and without the manual I would not have been able to maximize it's potential. Thank you.
;
Being a user of older radios of many kinds, preferring them over more modern rigs, this manual was invaluable in the programming of my two. I now know for certain what the assorted buttons functions are, and am very grateful to have found this excellent site. Many thanks for your assistance, Tony.
 ;
Clear and easy to read. All details as expected. Price acceptable , and quick delivery.
;
Quick response and exactly what I was looking for and at a great fair price!
;
5 star quality on these downloadable manuals. Easy to read and all the information is there. A must when doing a custom install or needing to service your precious old school electronics.
Getting Started
Before Installation
General Precautions
� DO NOT insert any metal object into the unit. � DO NOT disassemble the unit or remove screws, covers, or cabinet. � DO NOT expose the unit to rain or moisture.
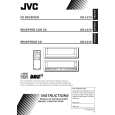
Putting Batteries in the Remote Control
Before using the remote control, put two supplied batteries first. � When using the remote control, aim the remote control directly at the remote sensor on the unit.
1 On the back of the remote control, remove the battery cover.
Locations
� Install the unit in a location that is level and protected from moisture. � The temperature around the unit must be between �5�C and 35�C (23�F and 95�F ). � Make sure there is good ventilation around the unit. Poor ventilation could cause overheating and damage the unit.
Handling the unit
� DO NOT touch the power cord with wet hands. � DO NOT pull on the power cord to unplug the cord. When unplugging the cord, always grasp the plug so as not to damage the cord. � Keep the power cord away from the connecting cords and the antenna. The power cord may cause noise or screen interference. It is recommended to use a coaxial cable for antenna connection, since it is well-shielded against interference. � When a power failure occurs, or when you unplug the power cord, the preset settings such as preset FM/AM (MW/LW) channels and sound adjustments may be erased in a few days.
2 Insert batteries. Make sure to match the polarity: (+) to (+) and (�) to (�).
Checking the Supplied Accessories
Check to be sure you have all of the following supplied accessories. The number in the parentheses indicates the quantity of the pieces supplied. � Remote Control (1) � Batteries (2) � AM (MW/LW) Loop Antenna (1) � FM Antenna (1) � SCART Cable (1) � Digital Coaxial Cord (1) If anything is missing, contact your dealer immediately. If the range or effectiveness of the remote control decreases, replace the batteries. Use two R6P(SUM-3)/AA(15F) type dry-cell batteries. CAUTION:
Follow these precautions to avoid leaking or cracking cells: � Place batteries in the remote control so they match the polarity: (+) to (+) and (�) to (�). � Use the correct type of batteries. Batteries that look similar may differ in voltage. � Always replace both batteries at the same time. � Do not expose batteries to heat or flame.
3 Replace the cover.
Getting Started
3
|
|
|
> |
|